

It is now possible to set your own custom subdomain (CNAME) for your media files URL's via Publitio. This can be even your own CDN like CloudFront or CloudFlare (if you think Publitio global infrastructure - which acts as CDN - is not fast enough). To cut the chase, jump directly to Publitio Cname Settings page to get started. Here are some detailed instructions how to setup everything on both your CNAME (DNS/CDN) part and on Publitio part.
Basic CNAME setup via DNS
First, let's do some basic CNAME setup via DNS. This will give you simple https://subdomain.yourdomain.com URL for your media files. Please note, Publitio will issue SSL certificate for your subdomain with basic setup via DNS, making it sure your media files URL's will work over https protocol.
1. Create DNS record for your CNAME
Go to DNS settings of your domain. This could be at WHM/cPanel, Route53, CloudFlare or your domain registrar. At our example we will add CNAME named keepit.keepdsmile.com pointing out (having CNAME value) to media.publit.io as in image bellow:
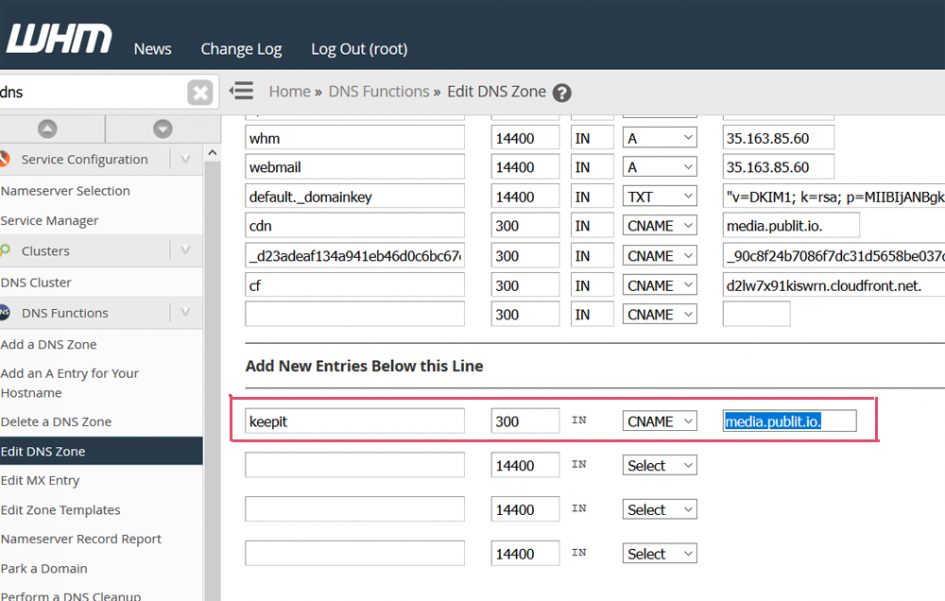 DNS Cname setup example via cPanel
Once added and Saved, our subdomain keepit.keepdsmile.com should work and point out to media.publit.io (if you see text output of your subdomain.yourdomain.com this part of setup is OK)
2. Enable Custom CNAME usage on Publitio part
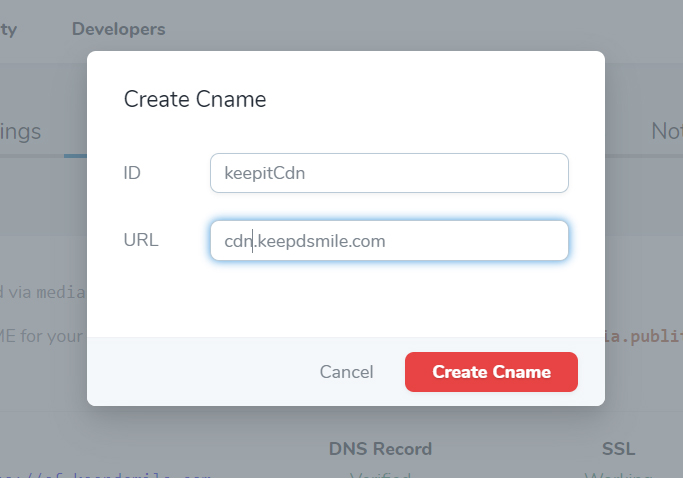
Finals step of basic setup for Custom CNAME usage is to go to Publitio CNAME Settings page and click on Add New Cname button. This will show modal dialog, where you can enter your CNAME info: for ID enter something unique (for example keepit or myCname, for your identification purpose) and for URL enter full subdomain that you have setup in previous step (keepit.keepdsmile.com in our example) as in image bellow :
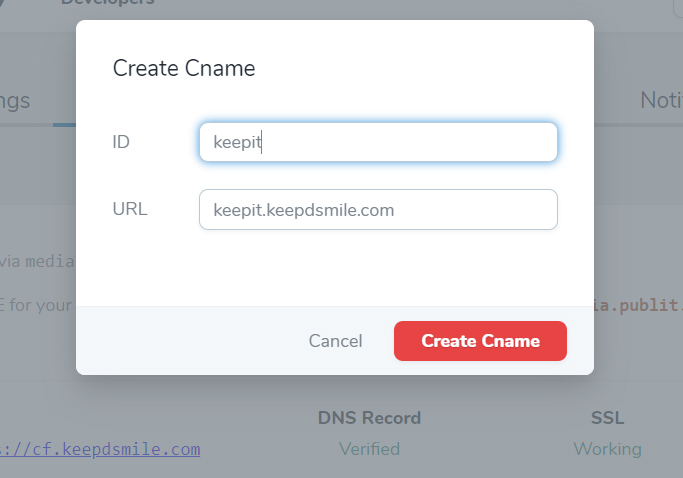 Add New Cname modal
To finish CNAME setup, click on Create Cname button. Publitio will now check for DNS setup from previous step and if everything is OK we will issue SSL certificate and setup your CNAME. Publitio media files URL (retrieved via Dashboard or API) will now be in the following form:
https://keepit.keepdsmile.com/file/cloud3dWM.png
And you can now perform all on-the-fly transformations on it as same as you do on media.publit.io. Alternatively you can still use media.publit.io and it will work as follows:
https://media.publit.io/file/cloud3dWM.png
Advanced setup via CloudFront CDN with HTTPS support
Now, lets create a CloudFront (CDN by Amazon) and setup it as a custom CNAME for your media files at Publitio. Setup is very similar for CloudFlare, so you should be able to do it in same manner as we do it here for CloudFront. Main difference is, both AWS CloudFront and Cloudflare will issue their own SSL certificate for https support for your subdomain, so any renewals of SSL will be done on their end (not by Publitio).
1. Create CloudFront Distribution
Please go to AWS CloudFront Management Console and create new distribution for Web. For Origin Domain Name enter media.publit.io. Origin ID can be anything you want (for your identification purpose). Origin Protocol Policy can be set to Match Viewer (but will work with other two options also):
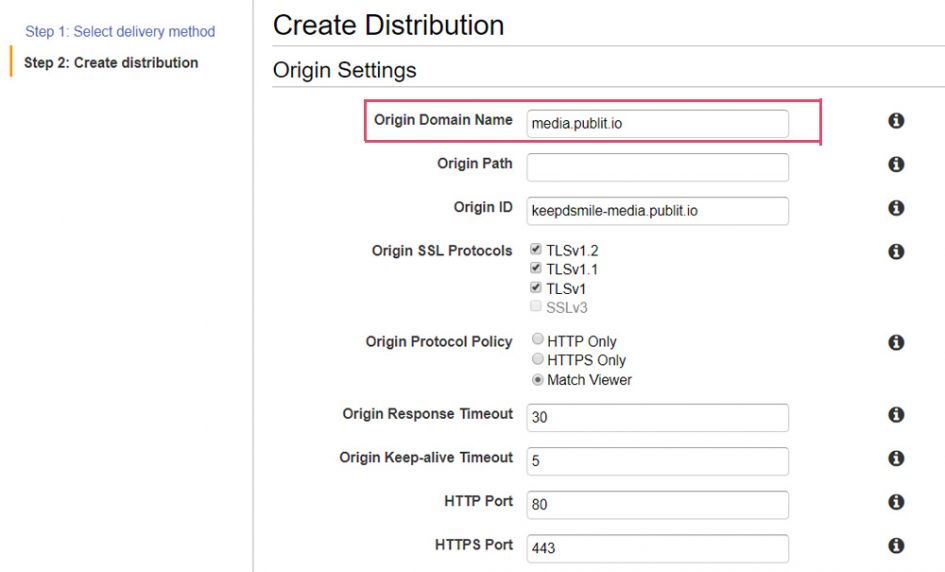 Create Cloudfront Distribution page
While still at Create Distribution page, scroll down to Distribution Settings part. Under the Alternate Domain Names (CNAMEs) enter your subdomain you want to use as a final custom CNAME - in our example it is cdn.keepdsmile.com. For SSL Certificate please opt-in Custom SSL Certificate radio button and select your custom ssl certificate - in our example it is SSL for *.keepdsmile.com. You can create free wildcard SSL certificate for your domain at AWS (follow instruction on page).
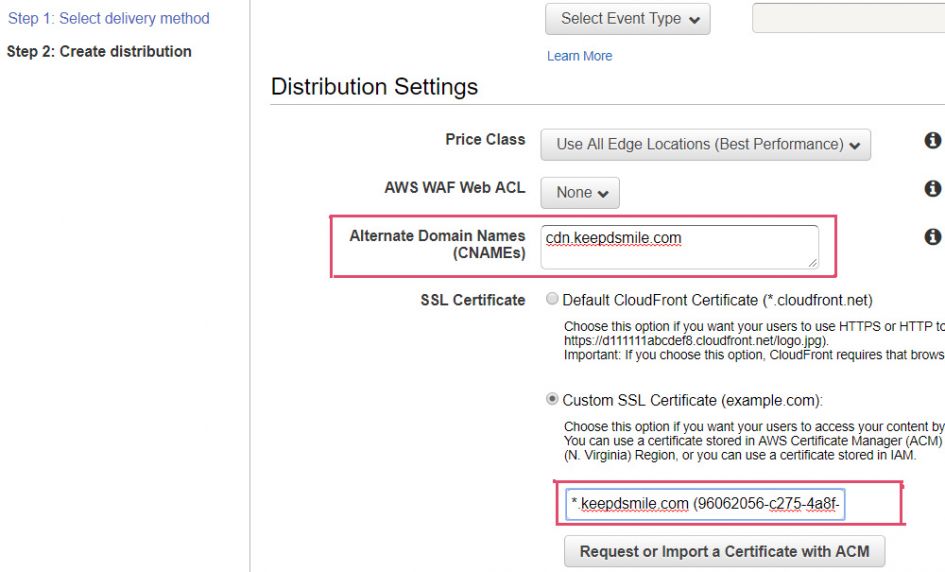 Cloudfront Distribution settings
Once done, click on Create Distribution button at bottom of page and please wait till your CloudFront Distribution is created.
2. Create DNS record pointing out to your CloudFront Distribution
You will get Domain Name URL for your CF Distribution in following form: diev3oxjp395j.cloudfront.net. Go to DNS settings of your domain and create CNAME record to match Alternate Domain Name (CNAME) you used on your distribution (in our example it is cdn.keepdsmile.com) that points to CF Domain Name URL diev3oxjp395j.cloudfront.net
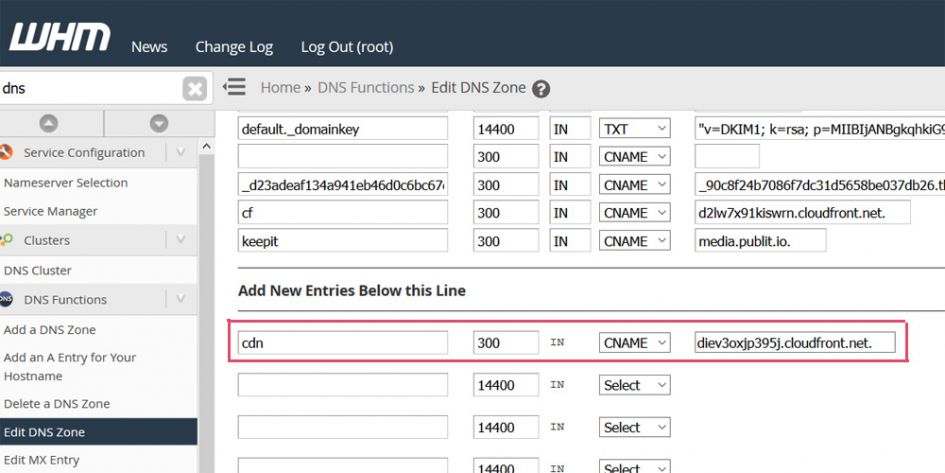 DNS Cname setup via cPanel poitning to cloudfront CDN url
Once everything is saved and your DNS record is propagated your subdomain (in our example cdn.keepdsmile.com) should now act as CloudFront CDN that points to media.publit.io.
3. Enable Custom CNAME usage on Publitio part
Finals step of basic setup for Custom CNAME usage is to go to Publitio CNAME Settings page and click on Add New Cname button. This will show modal dialog, where you can enter your CNAME info: for ID enter something unique (for example keepit or myCname, for your identification purpose) and for URL enter full subdomain that you have setup in previous step (keepit.keepdsmile.com in our example) as in image bellow :
 Add New Cname modal
To finish CNAME setup, click on Create Cname button. Publitio will now check for DNS setup from previous step and if everything is OK we will setup your CNAME. Since we used CloudFront with custom SSL certificate this will now work both via HTTPS and HTTP protocols. Our media files URL (retrieved via Dashboard or API) will now be in following form:
https://cdn.keepdsmile.com/file/paris.jpg
http://cdn.keepdsmile.com/file/paris.jpg
4. Additional Step for Domain Level Protection
If you have Domain Level Protection enabled on your account, it is necessary to perform one more step in order for whole setup to work properly. You need to Whitelist Headers sent via CloudFront Distribution to media.publit.io. Please go to your CloudFront Distribution and look out for Behaviors tab
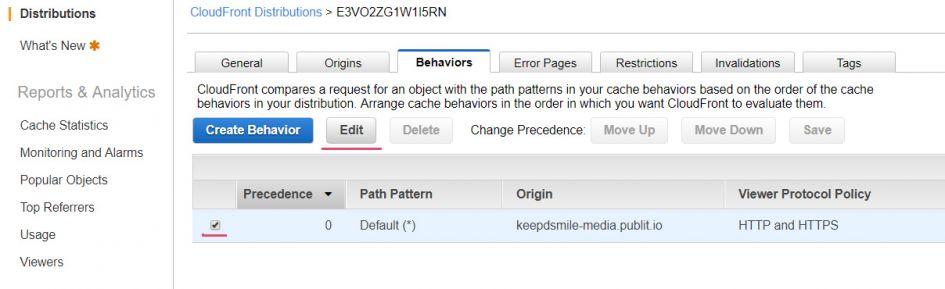
Check Default (*) and click on a Edit button. While on Edit Behaviors page under the Cache Based on Selected Request Headers please select Whitelist and at Whitelist Headers add Referer and Host to list as in image bellow:
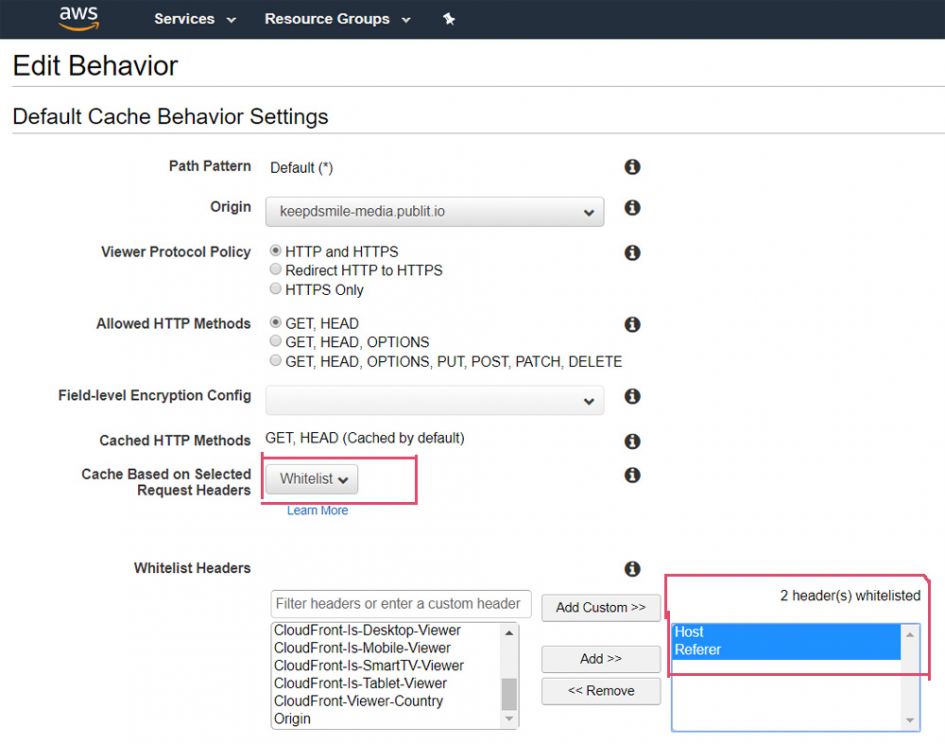 Edit CloudFront Behaviour page
This will allows us to identify referring domain and is necessary step in order for Domain Level Protection to work via CloudFront CDN.
Multiple CNAMEs and Default CNAME usage
It is now possible to have multiple CNAME under one account. You can choose Default CNAME from settings page simply by toggling ON default switch for desired cname as in image bellow:
 Default CNAME selection
To use different CNAME when retrieving media files URL either pass &cname=yourCnameID param via API call or select desired cname from Share (Embed&Player code) modal as in following image :
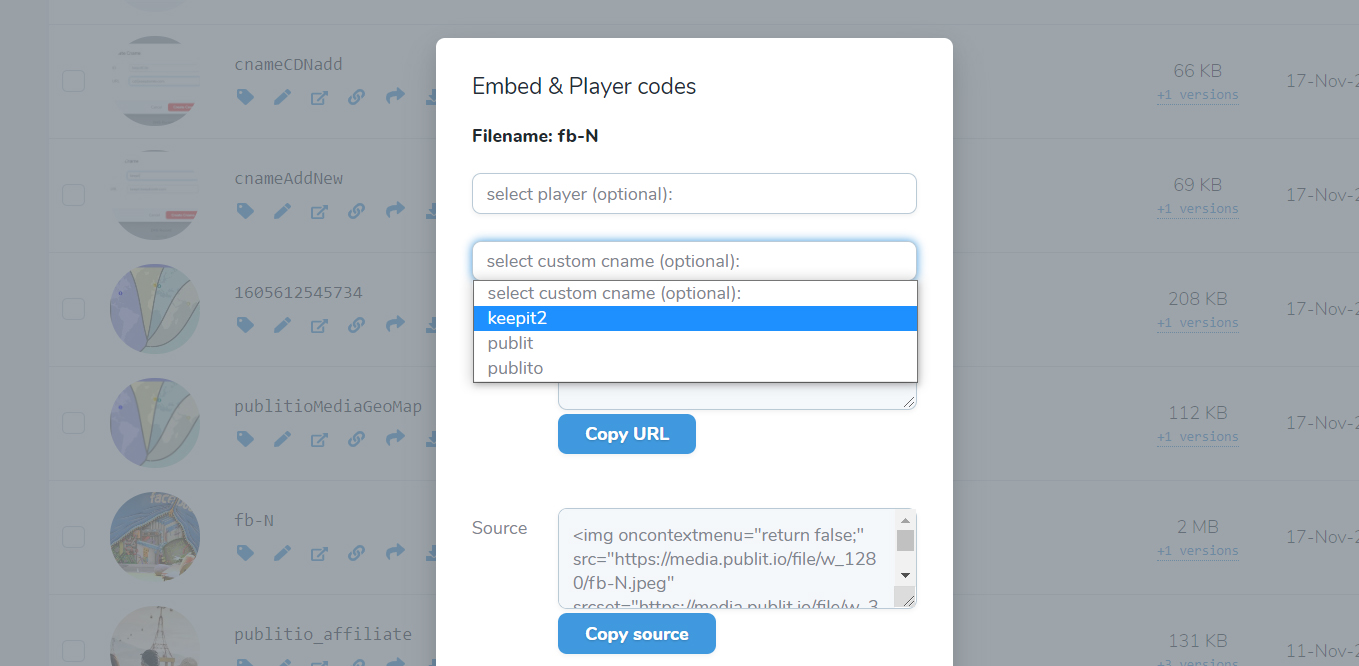 Share (Embed and Player codes) modal and custom CNAME option
Good luck with setup and if you have any questions or comments please let us know.


