


How to FFmpeg Use GPU Acceleration for Faster Video Encoding
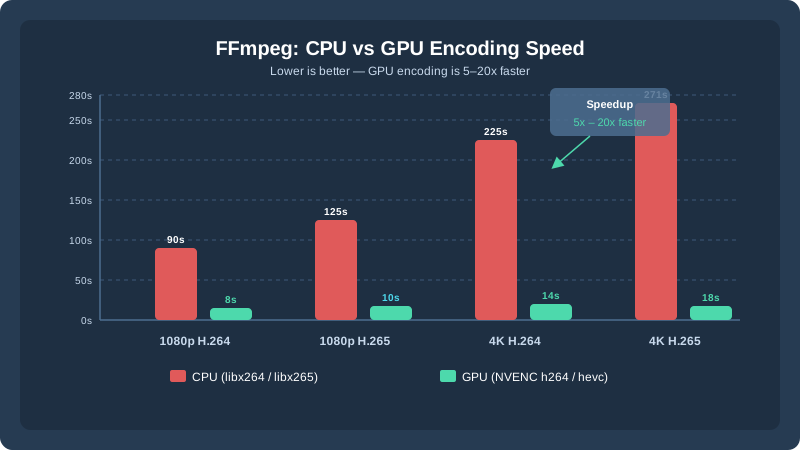
If you've ever tried to transcode a long video file on a standard CPU, you know how painfully slow the process can be. Learning how to FFmpeg use GPU acceleration is one of the most impactful steps you can take to dramatically cut down encoding times — sometimes by 5x to 20x compared to software-only rendering. In this guide, we'll walk through everything you need to know: which GPU APIs FFmpeg supports, how to configure hardware encoders on NVIDIA, AMD, and Intel hardware, and how to integrate GPU-accelerated workflows into production pipelines. Whether you're a developer building a streaming platform or a content creator processing large video libraries, this tutorial will help you get the most out of your hardware.
Why GPU Acceleration Matters for Video Encoding
Video encoding is one of the most computationally intensive tasks in modern media workflows. A single 4K H.264 encode can take minutes on a CPU, while the same job can complete in seconds when offloaded to a GPU. The reason comes down to parallelism: CPUs are optimized for sequential tasks with a relatively small number of powerful cores, whereas GPUs contain thousands of smaller cores purpose-built for the kind of massively parallel math that underlies video compression algorithms.
For platforms handling large volumes of video — think video-on-demand services, user-generated content sites, or enterprise media libraries — CPU-only encoding simply doesn't scale. GPU-accelerated encoding frees up CPU resources for other application tasks, lowers total processing time, and reduces infrastructure costs when you're paying for compute by the hour.
If you want a managed solution that already handles GPU-accelerated video processing under the hood, Publitio's GPU video conversion feature lets you skip the infrastructure setup entirely. But if you're building your own pipeline or just want to understand how FFmpeg GPU encoding works at a low level, read on.
Supported GPU Acceleration APIs in FFmpeg
FFmpeg supports multiple hardware acceleration frameworks, each tied to a specific GPU vendor or platform. Before you run any commands, you need to know which API is available on your system.
NVIDIA NVENC and NVDEC
NVIDIA's NVENC (encoder) and NVDEC (decoder) are the most widely used GPU acceleration APIs in FFmpeg workflows. They are available on any NVIDIA GPU with Kepler architecture or newer (GTX 600 series and above). NVENC supports H.264, H.265 (HEVC), and AV1 encoding on newer Ampere and Ada Lovelace GPUs.
AMD AMF (Advanced Media Framework)
AMD's AMF API is supported through FFmpeg's h264_amf and hevc_amf encoders. It works on Radeon RX series and newer Vega, RDNA, and RDNA 2 GPUs. Performance is competitive with NVENC for H.264 but has historically lagged behind in H.265 quality-per-bitrate metrics.
Intel Quick Sync Video (QSV)
Intel Quick Sync is available on Intel Core processors with integrated graphics (Sandy Bridge and newer) and Intel Arc discrete GPUs. FFmpeg exposes this via encoders like h264_qsv and hevc_qsv. Quick Sync is particularly compelling in server environments where dedicated GPU hardware may not be present but Intel Xeon processors are used.
VA-API (Linux)
Video Acceleration API (VA-API) is a Linux-specific framework that provides a vendor-neutral interface to GPU-accelerated encoding and decoding. It works with Intel and AMD hardware under Linux and is commonly used in headless server environments.
VideoToolbox (macOS)
On macOS, Apple's VideoToolbox framework is FFmpeg's gateway to hardware-accelerated encoding using the GPU or dedicated media engine on M-series chips. It supports H.264 and H.265 encoding with excellent quality.
How to Check If Your FFmpeg Build Supports GPU Encoding
Not all FFmpeg builds come with hardware encoder support compiled in. Before you attempt to use GPU acceleration, verify your build includes the encoders you need.
Run the following command to list all available encoders:
ffmpeg -encoders | grep -E "nvenc|amf|qsv|vaapi|videotoolbox"You should see output lines beginning with V for video encoders. For example, a system with NVIDIA support might show:
 V..... h264_nvenc           NVIDIA NVENC H.264 encoder
 V..... hevc_nvenc           NVIDIA NVENC hevc encoder
If you don't see any hardware encoders listed, you may need to install a different FFmpeg build. On Ubuntu, the ffmpeg package from the default repository often lacks NVENC support — you'll want to install from a PPA or compile FFmpeg from source with the appropriate flags.
To compile with NVENC support, for example, you'd include --enable-nvenc and --enable-cuda-nvcc in your ./configure call, along with pointing to your CUDA SDK installation.
FFmpeg Use GPU with NVIDIA NVENC: Step-by-Step
NVIDIA's NVENC is the most documented and widely adopted GPU encoder for FFmpeg. Here's how to put it to work.
Basic NVENC Encoding Command
The simplest way to FFmpeg use GPU acceleration with NVIDIA is to swap out the software encoder for its NVENC counterpart:
ffmpeg -i input.mp4 -c:v h264_nvenc -preset p4 -cq 23 -c:a copy output.mp4Breaking down the key flags:
-c:v h264_nvenc— selects the NVIDIA GPU-accelerated H.264 encoder-preset p4— balances speed and quality (p1 is fastest, p7 is slowest/best quality)-cq 23— constant quality mode, similar to CRF in software encoders-c:a copy— copies the audio stream without re-encoding
GPU-Accelerated Decoding + Encoding Pipeline
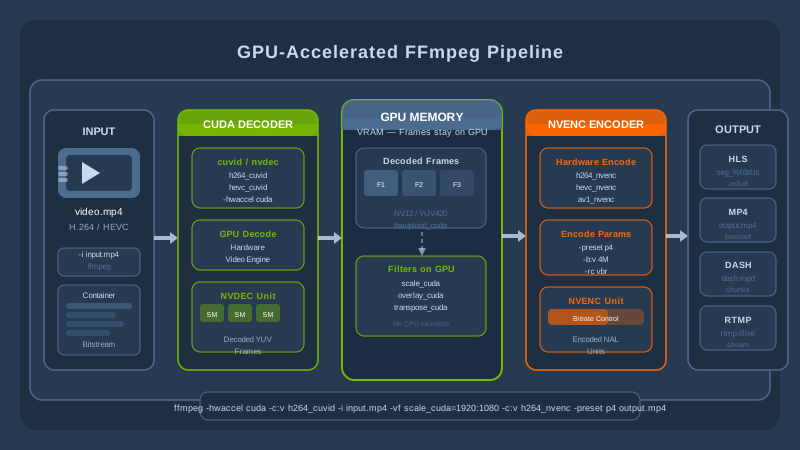
For the fastest possible pipeline, you should also offload decoding to the GPU. This keeps the data on the GPU memory bus and avoids expensive CPU-GPU transfers:
ffmpeg -hwaccel cuda -hwaccel_output_format cuda \
  -i input.mp4 \
  -c:v h264_nvenc -preset p4 -cq 23 \
  -c:a copy output.mp4
The -hwaccel cuda flag tells FFmpeg to use CUDA for hardware-accelerated decoding, and -hwaccel_output_format cuda keeps decoded frames in GPU memory so the encoder can access them directly.
Encoding to H.265/HEVC with NVENC
H.265 typically cuts file sizes in half compared to H.264 at equivalent quality, making it essential for video-on-demand delivery and streaming platforms where bandwidth and storage costs matter:
ffmpeg -hwaccel cuda -hwaccel_output_format cuda \
  -i input.mp4 \
  -c:v hevc_nvenc -preset p5 -cq 28 \
  -tag:v hvc1 \
  -c:a copy output_hevc.mp4
The -tag:v hvc1 flag ensures compatibility with Apple devices and browsers, which require this specific tag for HEVC in MP4 containers.
FFmpeg GPU Commands for AMD and Intel
AMD AMF Encoding
On Windows with an AMD GPU, use the AMF encoder:
ffmpeg -i input.mp4 -c:v h264_amf -quality speed -b:v 4M -c:a copy output.mp4The -quality flag accepts speed, balanced, or quality as values. For HEVC output:
ffmpeg -i input.mp4 -c:v hevc_amf -quality balanced -b:v 2M -c:a copy output_hevc.mp4Intel Quick Sync (QSV) Encoding
On a Linux or Windows machine with Intel integrated or discrete graphics:
ffmpeg -hwaccel qsv -i input.mp4 \
  -c:v h264_qsv -preset medium -global_quality 25 \
  -c:a copy output.mp4
For HEVC with QSV:
ffmpeg -hwaccel qsv -i input.mp4 \
  -c:v hevc_qsv -preset medium -global_quality 28 \
  -c:a copy output_hevc.mp4
VA-API on Linux
ffmpeg -hwaccel vaapi -hwaccel_device /dev/dri/renderD128 \
  -hwaccel_output_format vaapi \
  -i input.mp4 \
  -c:v h264_vaapi -qp 23 \
  -c:a copy output.mp4
You may need to adjust /dev/dri/renderD128 to match your actual GPU device path. Use ls /dev/dri/ to list available render nodes.
Apple VideoToolbox (macOS)
ffmpeg -i input.mp4 -c:v h264_videotoolbox -b:v 4M -c:a copy output.mp4On Apple Silicon Macs, VideoToolbox leverages the dedicated media engine for extremely fast encoding that barely affects battery life or CPU usage.
Practical GPU-Accelerated Workflows
Batch Encoding Multiple Files
When processing entire video libraries — such as when migrating assets to a video management platform — you'll want to batch-encode files. Here's a simple Bash loop:
for f in *.mp4; do
  ffmpeg -hwaccel cuda -hwaccel_output_format cuda \
    -i "$f" \
    -c:v h264_nvenc -preset p4 -cq 23 \
    -c:a copy \
    "encoded_${f}"
done
Generating HLS Adaptive Bitrate Streams
For HLS streaming delivery, you typically need multiple quality renditions. GPU acceleration makes generating these multiple encodes far more practical:
ffmpeg -hwaccel cuda -hwaccel_output_format cuda \
  -i input.mp4 \
  -map 0:v -map 0:a -map 0:v -map 0:a -map 0:v -map 0:a \
  -c:v:0 h264_nvenc -preset p4 -b:v:0 5M \
  -c:v:1 h264_nvenc -preset p4 -b:v:1 2M \
  -c:v:2 h264_nvenc -preset p4 -b:v:2 800k \
  -c:a aac -b:a 128k \
  -var_stream_map "v:0,a:0 v:1,a:1 v:2,a:2" \
  -master_pl_name master.m3u8 \
  -f hls -hls_time 6 -hls_list_size 0 \
  -hls_segment_filename "stream_%v/seg_%03d.ts" \
  stream_%v/index.m3u8
This single command generates three quality renditions (5 Mbps, 2 Mbps, 800 kbps) plus a master playlist, all encoded in parallel using NVENC.
Adding Watermarks During GPU Encode
You can overlay a logo or text watermark during the encode pass. Note that filters typically require a CPU-side operation, so you'll need to handle the pixel format conversion:
ffmpeg -hwaccel cuda -hwaccel_output_format cuda \
  -i input.mp4 -i logo.png \
  -filter_complex "[0:v]hwdownload,format=nv12[base];[base][1:v]overlay=10:10[out];[out]hwupload_cuda" \
  -map "[out]" -map 0:a \
  -c:v h264_nvenc -preset p4 -cq 23 \
  -c:a copy output_watermarked.mp4
If watermarking and asset protection are important to your workflow, Publitio's watermarking feature handles this automatically through a URL-based API, removing the need to run custom FFmpeg filter graphs.
Monitoring GPU Utilization During Encoding
While an NVENC job is running, monitor GPU utilization with:
nvidia-smi dmon -s uYou'll see columns for encoder utilization (enc) and decoder utilization (dec) in addition to the general GPU utilization percentage. A healthy NVENC encode should show encoder utilization well above 50%. If it's low, the bottleneck may be on the input/output side (disk read speeds) rather than the GPU itself.
Quality Considerations When Using FFmpeg with GPU
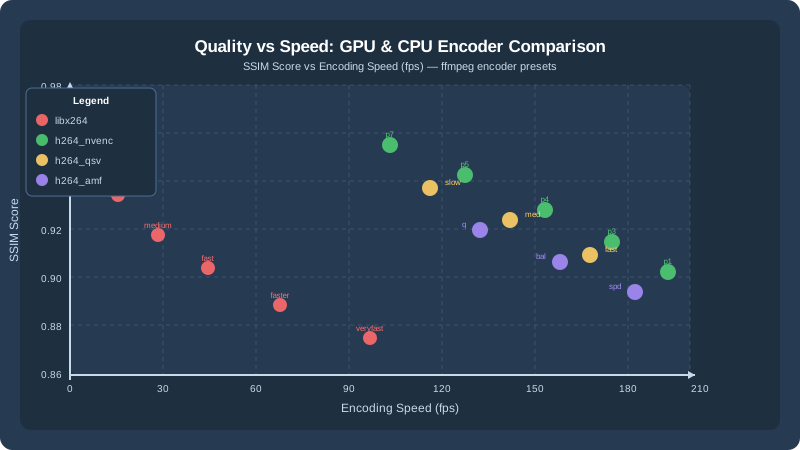
A common concern when switching from software encoders like libx264 to GPU encoders is quality. In general, at the same bitrate, software encoders produce slightly better quality because they have more time to analyze frames and make optimal encoding decisions. GPU encoders prioritize throughput over exhaustive analysis.
In practice, for most streaming and web delivery use cases — where files are being played at 1080p or below on consumer displays — the quality difference is imperceptible to viewers. For archival or mastering purposes where you need maximum quality, software encoding remains the gold standard.
Some practical tips to maintain quality with GPU encoding:
- Use a slightly lower CQ/QP value than you would with software encoding (e.g., CQ 21 instead of CRF 23)
- Use
-preset p5or higher on NVENC for better quality at the cost of some speed - Enable B-frames where supported:
-bf 3on NVENC significantly improves compression efficiency - Use two-pass encoding for bitrate-constrained outputs (e.g., for upload to platforms with strict bitrate caps)
Integrating GPU Encoding into Production Video Pipelines
Running FFmpeg commands locally is great for testing, but production video pipelines need reliability, scalability, and monitoring. A few architectural patterns to consider:
Queue-Based Processing
Place video encoding jobs in a message queue (Redis, RabbitMQ, AWS SQS) and have worker processes consume and execute FFmpeg jobs. This lets you scale horizontally by adding more GPU workers during peak load.
Cloud GPU Instances
Cloud providers offer GPU instances specifically for transcoding workloads. AWS P3 and G4 instances, Google Cloud N1 with NVIDIA T4, and Azure NV-series all support NVENC. You can spin instances up and down based on queue depth, making it cost-effective for variable workloads.
Combining with a CDN
Once encoded, video files need to be delivered quickly to end users worldwide. Pairing your GPU encoding pipeline with a global CDN ensures that transcoded assets are cached at edge locations close to viewers, minimizing buffering and latency. You can also track how your video assets are performing with Publitio's analytics to understand viewing patterns and optimize your encoding ladder accordingly.
Managing Your Encoded Video Library
As your library of encoded video assets grows, you'll need a robust way to organize, search, and retrieve them. A dedicated digital asset management system gives you metadata tagging, folder hierarchies, access controls, and API-driven retrieval — all essential for teams working with large video catalogs. You can also explore media asset management features designed specifically for video and rich media workflows.
Common Errors and How to Fix Them
"No NVENC capable devices found"
This means FFmpeg cannot access the NVIDIA GPU. Check that the NVIDIA driver is installed and up to date, and that you're not running inside a container without GPU passthrough configured.
"Impossible to convert between the formats"
This pixel format mismatch error often occurs when mixing hardware and software filters. Insert explicit format conversion filters like hwdownload,format=nv12 and hwupload_cuda around software filter steps.
Low encoding speed despite GPU
Check that -hwaccel cuda is being used for decoding as well as encoding. Also verify disk I/O isn't the bottleneck — use SSDs or RAM-backed tmpfs for high-throughput encoding jobs.
Audio sync issues
If you notice audio drift in outputs, add -async 1 or use the aresample filter to correct timing before encoding.
When to Use a Managed Platform Instead
Self-hosting GPU-accelerated FFmpeg pipelines gives you maximum control, but it also comes with significant DevOps overhead: provisioning GPU instances, maintaining FFmpeg builds, handling failures, scaling workers, and monitoring jobs. For many teams, the engineering cost outweighs the flexibility.
Platforms like Publitio abstract all of this complexity away. You upload a video through a simple API or the free video API, and the platform handles transcoding, video processing, HLS packaging, CDN delivery, and storage — with GPU acceleration under the hood. You can also explore the Publitio documentation to see how quickly you can integrate video upload, processing, and delivery into your application.
For WordPress users managing media-heavy sites, the WordPress media offloading solution lets you move video and image assets off your server entirely, serving them through Publitio's optimized infrastructure instead.
Conclusion
Knowing how to FFmpeg use GPU acceleration is a superpower for anyone working with video at scale. Whether you're encoding for a streaming service, processing user uploads, or building a video analytics platform, switching from software to hardware encoding can transform your pipeline's throughput and economics. Start with the basic NVENC commands, validate your quality benchmarks, then build out the queue-based infrastructure to scale as demand grows.
Ready to skip the infrastructure headaches entirely? Sign up at publit.io and start processing, hosting, and delivering videos in minutes. Publitio's GPU-powered transcoding, HLS streaming, CDN delivery, and developer-friendly API give you everything you need to build a world-class video platform — without managing a single server. View pricing plans and get started for free today.


